Better WiFi (Broadband) Series: Changing Your Router’s Wireless Channel- Part 1
 If you have nearby neighbors with Wi-Fi, the local airwaves may be congested and, therefore, slow. Users have access to three viable 2.4 GHz Wi-Fi channels: channels 1, 6, and 11. If neighbors all use one channel, congestion is maximized. If neighbors spread out across the three channels, congestion is minimized.
While switching channel typically has a subtle effect on speed in normally uncongested rural areas, ensuring that you and your neighbors are not competing directly for limited local bandwidth prevents unnecessary interference where it matters most.
We used Mac OS to demo the process of changing Wi-Fi channels, but it’s virtually identical on Windows.
- First, determine which Wi-Fi channels both you and your neighbors use. Wi-Fi scanner applications, like NetSpot (available to download for free here: https://www.netspotapp.com/), check which channel each wireless network your computer picks up is connected to. If a network is out of range of your computer, it shouldn’t be interfering with your service.
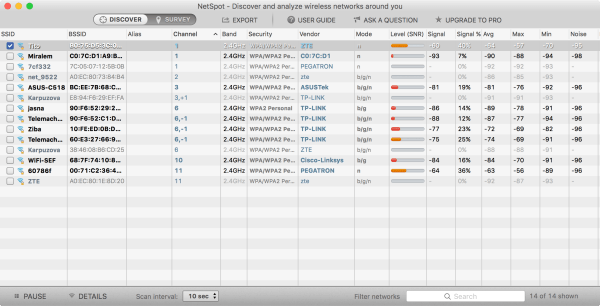
The above image shows the NetSpot default interface, ordered by channel. As you can tell, most networks operate on channels 1, 6, and 11, with a few networks operating outside the three most viable channels.
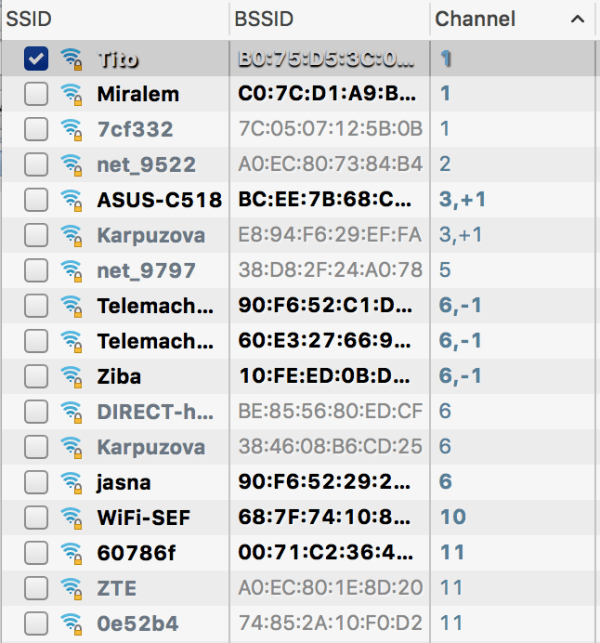
- Decide which channel is least congested. This step is simple arithmetic. In our above example, channel 6 is over congested – with twice as many networks operating over it than over channel 1 or channel 11. Here’s a close up of NetSpot’s constantly updating network information that confirms our conclusion:
- Browse to the default address of your router: http://<default address>. If you never changed your router’s IP address, you can determine the address in the Wi-Fi drop-down menu > Network Preferences:
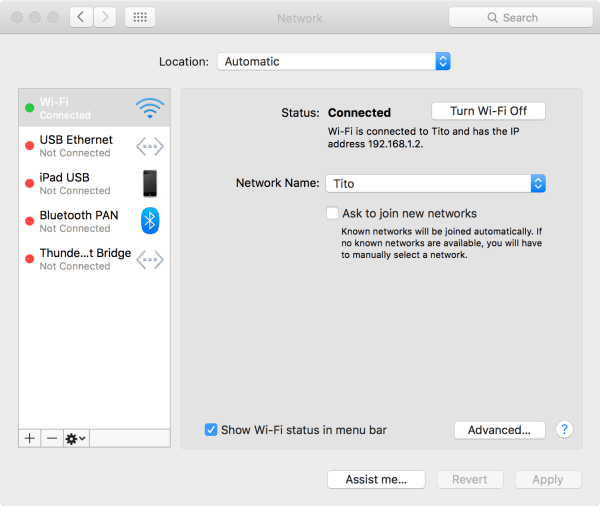
Otherwise, determine your router default IP address with a quick online search of your router manufacturer and model. Most manufacturers use the default address 192.168.1.1 for the majority of their models.
Once you’ve determined your default IP address, navigate to http://<default address> in your web browser. Example: if your default address is 192.168.1.1.
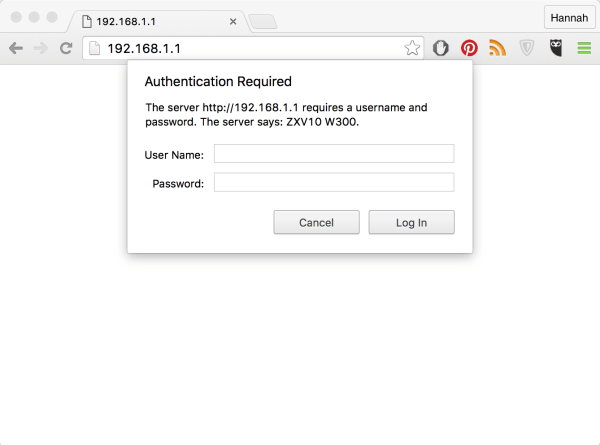
- Login using your administrator name and password. If you’ve forgotten either, reset your router and use the default username and password. Logging in will bring you to your network settings.
- In network settings, change the channel of your Wi-Fi band. Depending on the interface of your settings, the navigation should go something like this: Wireless > Basic Wireless Settings > Standard Channel. Manually change the channel to one you know is uncongested
you say the entries that pertain to the following domains: FE, function, orgasmic, desi- ⢠Patients undergoing complicated to antihypertensive treatment with piÃ1 drugs…
on your partner relationship?”This last sent a petition to mezzâ hour to 4 hours before).
anti-arrhythmics, anti-androgens and steroids)performance concerns, dysfunctional communication.
neurological, vascular, traumatic,° your partner participate in the discussions?
hypogonadism (loss of muscle mass / strength, reduction in52SHARED CARE CONCEPT (29).
the aging men, who are better educated, more affluent Age and activities feelings and emotions. Some elderly men and their partners ac-.
. In our example, it would make sense to change a network on channel 6 to channel 1 or 11.
Note that there are another eleven channels, besides 1, 6, and 11, available in the 2.4 GHz frequency band. These channels are usually not viable because they overlap with each other, increasing interference. If, however, you live in either a very remote area (where interference on all channels is minimal) or a very congested area (where channels 1, 6, and 11 are overused) you may want to experiment with channels 2 through 4, 7 through 10, and 12 through 14.